As a Mac user, you may have once installed Visual Studio for developing applications. However, if you no longer need this software or want to free up some space on your device, you might be wondering how to uninstall Visual Studio on Mac. Uninstalling Visual Studio can seem like a daunting task, especially for those who are not tech-savvy. But fear not, as this guide will provide you with a step-by-step process to remove Visual Studio from your Mac without any hassle.
Visual Studio is a powerful tool, but sometimes we need to let go of certain applications to keep our device running smoothly. Uninstalling Visual Studio may not be as straightforward as dragging and dropping an app icon to the Trash. It requires a bit more effort and knowledge, but with the help of this guide, you will be able to uninstall Visual Studio on Mac in no time. So, let’s dive into the process and get started with freeing up some space on your device.
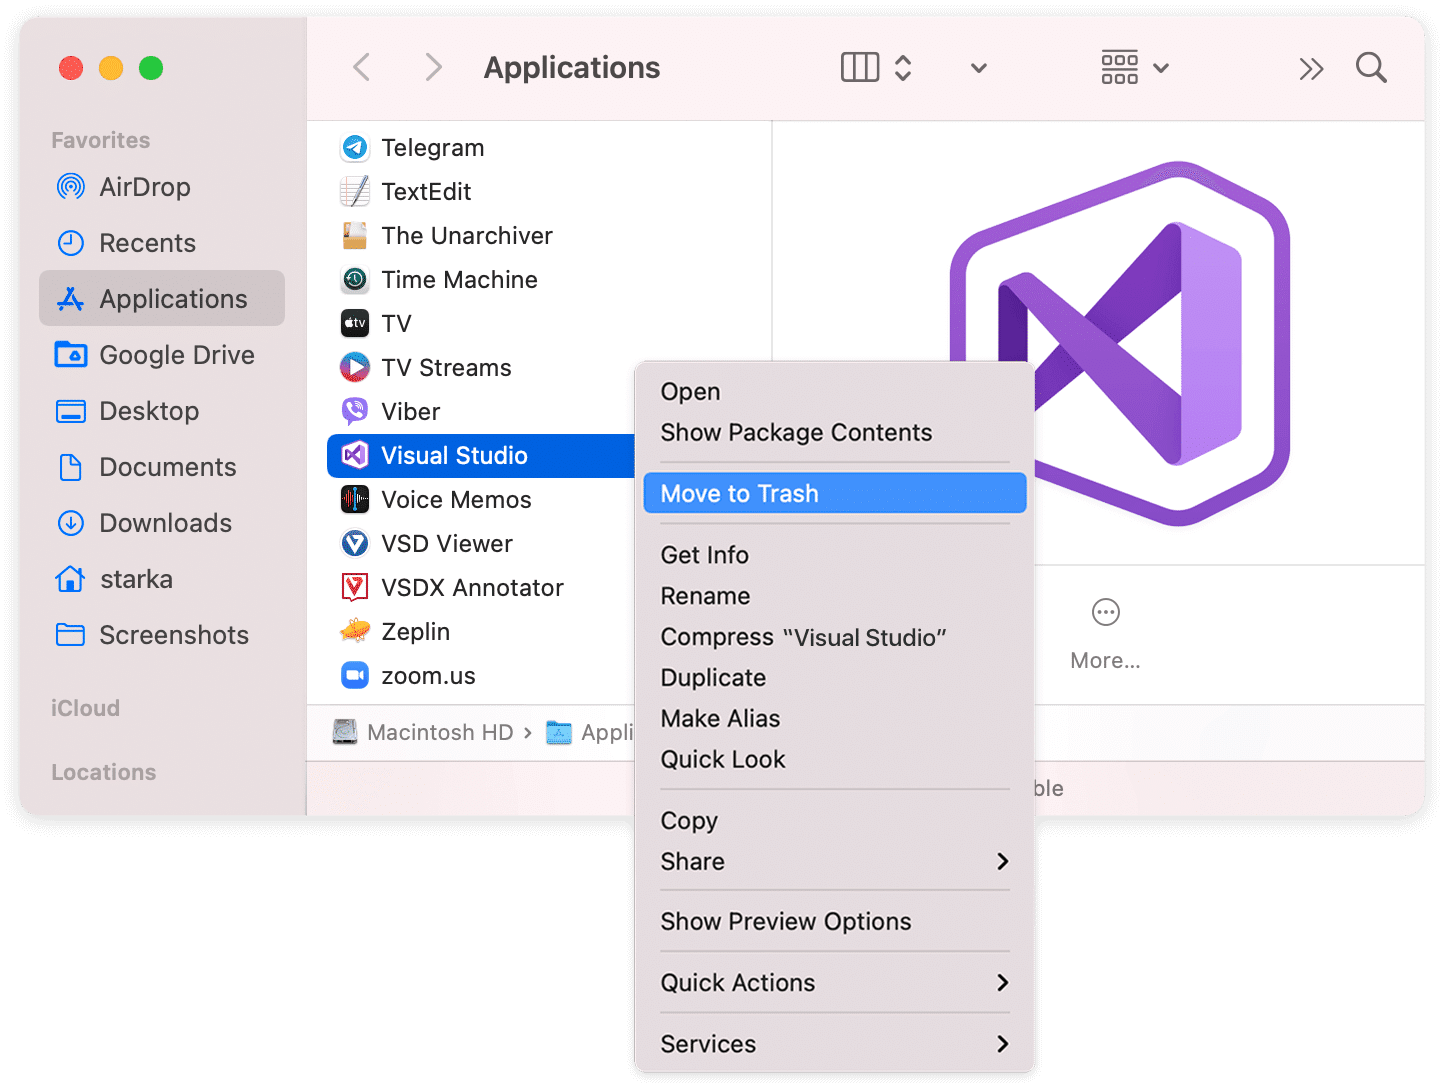
1. Open the Applications folder and find the Visual Studio app.
2. Drag the app to the Trash.
3. Alternatively, you can right-click on the app and select Move to Trash.
4. Empty the Trash.
Comparison of Visual Studio vs Xcode
| Visual Studio | Xcode |
|---|---|
| Developed by Microsoft | Developed by Apple |
| Supports multiple programming languages | Supports Swift and Objective-C |
| Supports Windows, Linux, and Mac operating systems | Only supports Mac operating system |
| Offers extensive debugging capabilities | Offers basic debugging capabilities |
How to Uninstall Visual Studio on Mac?
Visual Studio is a popular Microsoft development environment. It is used by many developers to create applications and websites. Unfortunately, it can be difficult to uninstall Visual Studio on Mac computers. This tutorial will guide you through the steps of uninstalling Visual Studio on Mac.
Step 1 – Uninstall Visual Studio
The first step to uninstalling Visual Studio on a Mac is to open the Applications folder. Locate the Visual Studio application and right-click on it. Select the option “Move to Trash”. This will delete the Visual Studio application and all of its associated files from your Mac.
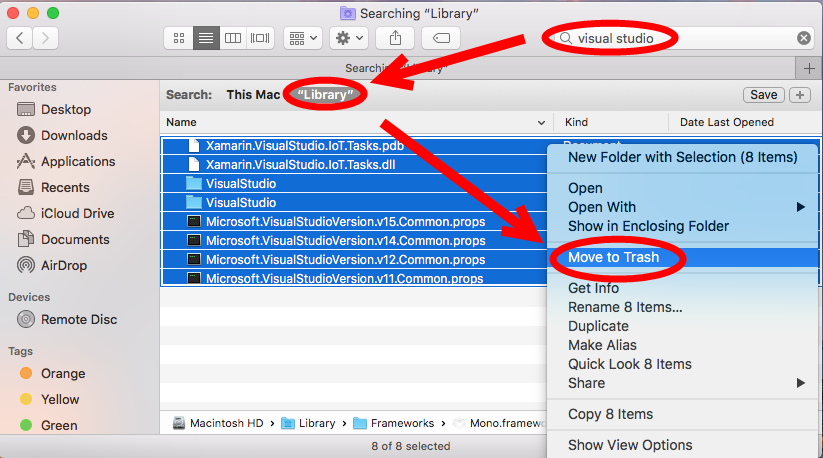
The next step is to open the Finder application on your Mac. Select the “Go” menu and then select the “Go to Folder” option. In the window that appears, enter the following path: ~/Library/Application Support/. Locate the Visual Studio folder and drag it to the Trash.
Step 2 – Clean Up Files
The final step is to remove any remaining files associated with Visual Studio. Open the Finder application and select the “Go” menu. Select the “Go to Folder” option and enter the following path in the window that appears: ~/Library/Preferences/. Locate any files that start with “com.microsoft.” and drag them to the Trash.
The next step is to open the Finder application and select the “Go” menu. Select the “Go to Folder” option and enter the following path in the window that appears: ~/Library/Logs/. Locate any files that start with “com.microsoft.” and drag them to the Trash. This will delete any logs or other files associated with Visual Studio.
Step 3 – Empty the Trash
The final step is to empty the Trash. This will permanently delete all of the files associated with Visual Studio. To empty the Trash, open the Trash folder and select the “Empty Trash” option. This will delete all of the files associated with Visual Studio from your Mac.
Frequently Asked Questions
Here are the answers to some commonly asked questions about how to uninstall Visual Studio on Mac.
Q1: How do I uninstall Visual Studio on Mac?
To uninstall Visual Studio on Mac, you will need to use the command line. Open the Terminal application, type in “sudo /Library/Frameworks/Mono.framework/Commands/mono /Library/Frameworks/Mono.framework/Versions/Current/lib/mono/4.5/Microsoft.Common.targets/uninstall.exe”, and press enter. This will launch the Visual Studio Uninstaller. Follow the on-screen instructions to complete the uninstallation.
Q2: Do I need to restart my Mac after uninstalling Visual Studio?
No, you do not need to restart your Mac after uninstalling Visual Studio. The uninstaller will remove all the Visual Studio-related files and folders, and you should be able to continue using your Mac as normal.
Q3: Will uninstalling Visual Studio delete my projects?
No, uninstalling Visual Studio will not delete your projects. All of your projects will remain on your Mac, unless you choose to delete them manually. However, if you have any Visual Studio-specific files or folders in the project, they will be removed.
Q4: Will I need to reinstall Visual Studio after uninstalling?
No, you will not need to reinstall Visual Studio after uninstalling. If you want to use Visual Studio again, you can simply download the latest version from the official website and install it normally.
Q5: Can I uninstall Visual Studio without using the command line?
No, you cannot uninstall Visual Studio without using the command line. The Visual Studio Uninstaller can only be launched using the command line. If you are not comfortable with using the command line, you can use an app like AppCleaner to uninstall Visual Studio. AppCleaner is a free app that can be used to uninstall any Mac app quickly and easily.
Completely Uninstall Visual Studio Code from a Mac
In conclusion, uninstalling Visual Studio on a Mac can be a straightforward process if you follow the steps outlined in this article. Although Visual Studio is a powerful tool for developers, it may not be the right fit for everyone. If you find that Visual Studio is not meeting your needs or is causing issues on your Mac, it’s important to properly uninstall it to avoid any potential conflicts with other software.
Remember to be cautious when uninstalling any software on your computer as it may affect other programs or files. Always make sure to back up any important data before proceeding with the uninstallation process. By following these steps and taking the necessary precautions, you can safely and effectively uninstall Visual Studio from your Mac and continue to work efficiently and effectively on your programming projects.