As Visual Studio is one of the most popular and widely used Integrated Development Environments (IDEs) for building software applications, it offers an extensive range of tools and features for developers. One such tool is the PictureBox control that enables developers to add images to their applications. If you’re new to using PictureBox in Visual Studio, you may find it a bit daunting at first. However, with the right guidance and a bit of practice, you can easily master using PictureBox to add images to your applications.
In this article, we’ll explore the basics of PictureBox in Visual Studio, including how to add and display images in your application. We’ll also cover some advanced features that allow you to manipulate images, such as resizing, rotating, and cropping. Whether you’re a beginner or an experienced developer, this article will help you get started with using PictureBox in Visual Studio and take your application development to the next level. So, let’s dive in and explore the world of PictureBox in Visual Studio!
PictureBox control in Visual Studio: PictureBox is a basic and useful control for displaying images in Windows Forms applications. It can display images from files, streams and resources. To use PictureBox in Visual Studio, drag and drop it from the toolbox onto the form and set its image property to the image that you want to display. You can also set other properties like size, background color, etc.
To use PictureBox in Visual Studio, follow these steps:
- Open Visual Studio and create a Windows Forms Application.
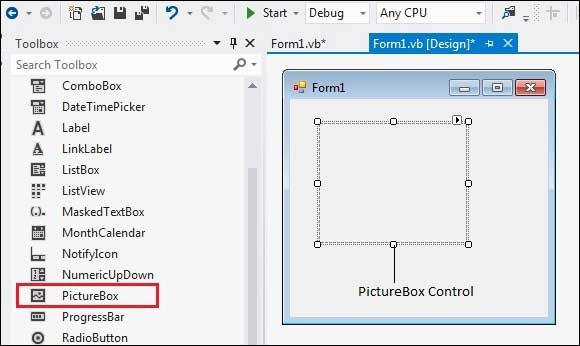
- Drag and drop the PictureBox control from the toolbox to the form.
- Select the PictureBox control and set its image property to the image that you want to display.
- You can also set other properties like size, background color, etc.
What is PictureBox?
PictureBox is a control in Visual Studio used to display a graphical image. It allows developers to easily create a graphical user interface (GUI) to display pictures, photos, or drawings in a Windows Form. PictureBox is a versatile control that can be used to display various types of images or to create a graphical user interface.
How to Use PictureBox in Visual Studio?
Step 1: Add PictureBox Control to Your Form
In order to use PictureBox control in Visual Studio, you must first add it to your Windows Form. To do this, go to the Toolbox and select the PictureBox control. Then, drag and drop the control onto your form. You can also double-click on the control to add it to your form.
Step 2: Set the Properties of the PictureBox Control
Once you have added the control to your form, you can configure its properties. To do this, select the control and then open the Properties window. From the Properties window, you can set the size and position of the PictureBox, as well as the background color and border style. You can also set properties such as whether the control will be visible, enabled, or read-only.
Step 3: Load an Image into the PictureBox Control
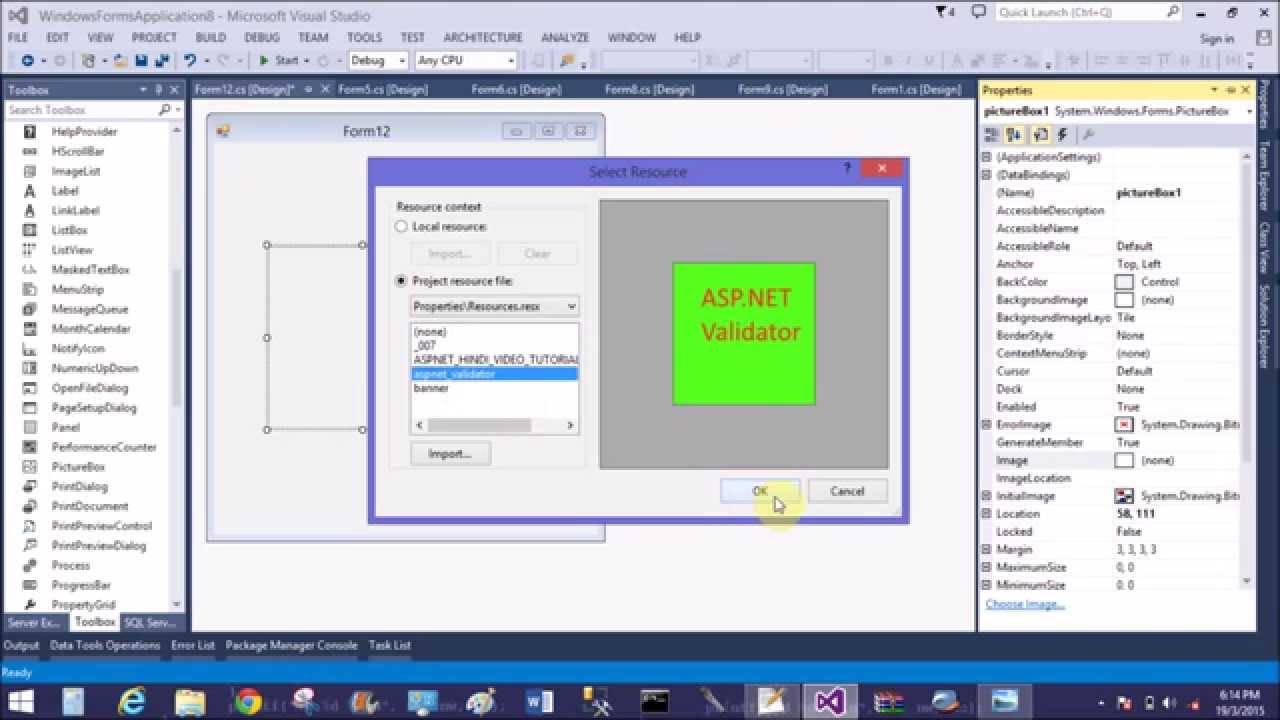
Once you have set the properties of the PictureBox control, you can now load an image into it. To do this, select the control and then open the Properties window. From the Properties window, select the Load button and then select the image you want to load. Once the image is loaded, it will be displayed in the PictureBox control.
Step 4: Use the PictureBox Control to Display Images
Once you have loaded an image into the PictureBox control, you can then use the control to display the image. To do this, select the control and then open the Properties window. From the Properties window, select the Size Mode drop-down list and then select the size mode that best fits the image. This will allow you to resize the image to fit the control.
Step 5: Save the PictureBox Control with the Image
Once you have used the PictureBox control to display an image, you can then save the control with the image. To do this, select the control and then open the Properties window. From the Properties window, select the Save button and then select the location where you want to save the image. The image will then be saved with the PictureBox control.
Frequently Asked Questions
Here you will find answers to the most common questions about using PictureBox in Visual Studio.
What is a PictureBox?
A PictureBox is a graphical control element in Visual Studio. It is used to display images, including icons, bitmaps and metafiles. It can also be used to create a surface on which to draw graphics. PictureBox allows you to control the image’s size, background color, and other settings.
How do I add a PictureBox to my form?
Adding a PictureBox to your form is easy. First, select the PictureBox tool in the Toolbox. Then, click and drag the mouse on the form to draw the PictureBox. You can also adjust the size of the PictureBox by dragging its borders.
How do I set an image as the PictureBox’s background?
You can set an image as the PictureBox’s background by using the Image property. To set the Image property, click the box next to the Image property in the Properties window and select the desired image file. The image will be displayed as the background for the PictureBox.
How do I draw with a PictureBox?
To draw with a PictureBox, you must first create a Graphics object from the PictureBox’s CreateGraphics() method. You can then use the Graphics object’s Draw methods to draw shapes, lines, and other objects on the PictureBox. You can also use the Graphics object to draw images.
How can I save the image drawn on a PictureBox?
You can save the image drawn on a PictureBox by using the Save() method of the Graphics object. To save the image, you need to specify the file format and the file name. Once you have saved the image, you can use it in other applications or share it with others.
How to use PictureBox in windows form application
In conclusion, PictureBox is a powerful tool for any developer looking to incorporate images into their projects. With Visual Studio’s intuitive interface and robust features, it’s easy to integrate PictureBox into your code and create dynamic, visually appealing applications.
Remember to keep in mind the best practices for working with PictureBox, such as using the correct image formats and optimizing your images for performance. By following these tips and incorporating PictureBox into your projects, you’ll be well on your way to creating stunning applications that are sure to impress users and clients alike. So don’t hesitate to experiment with PictureBox and see what kind of creative possibilities await!