As a professional writer, I understand the importance of having a reliable and efficient tool for image processing and computer vision applications. OpenCV is one such tool that has gained popularity among developers due to its ability to process images and videos in real-time. However, installing OpenCV with Python in Visual Studio Code on a Mac can be a daunting task for many developers.
This guide will provide step-by-step instructions on how to install OpenCV with Python in Visual Studio Code on a Mac. You will learn how to set up your environment, install the necessary packages, and configure your project to start using OpenCV. By the end of this guide, you will have a fully functional environment to work with OpenCV and Python in Visual Studio Code on your Mac. Let’s get started!
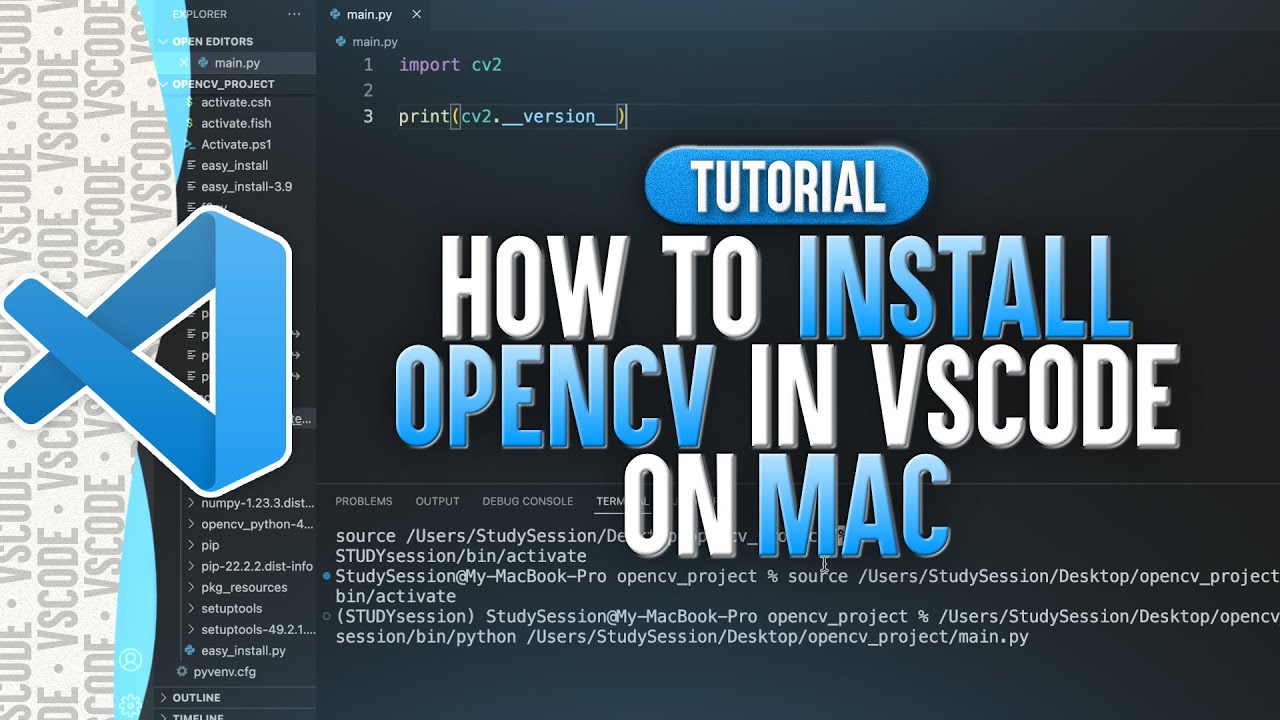
How to install OpenCV Python for Visual Studio Code on Mac?
Installing OpenCV Python for Visual Studio Code on Mac is easy. Here are the steps to follow:
- Download and install Visual Studio Code from the official website.
- Open Visual Studio Code and click on the Extensions icon.
- Search for OpenCV and click Install.
- Relaunch Visual Studio Code after the installation is complete.
- Open Python File and type
import cv2to check if OpenCV Python is successfully installed.
Alternatively, you can install OpenCV Python on Mac using Homebrew or Anaconda.
| Visual Studio Code | Homebrew | Anaconda |
|---|---|---|
| Easy Installation | Requires Command Line | Requires Command Line |
| Widely Used | Quick Installation | Contains Other Packages |
What Is OpenCV Python?
OpenCV Python is a Python library that is used for image processing and computer vision applications. It is used in various applications such as facial recognition, object detection, and video analytics. OpenCV Python is an open-source library which is free to use and modify. It is compatible with both Windows and Mac operating systems.
How to Install OpenCV Python in Visual Studio Code Mac?
Step 1: Install Homebrew
The first step in installing OpenCV Python is to install Homebrew, a package manager for Mac OS. Homebrew allows you to easily install and manage software packages on your Mac. To install Homebrew, open the Terminal application on your Mac and type the following command:
“`
/usr/bin/ruby -e “$(curl -fsSL https://raw.githubusercontent.com/Homebrew/install/master/install)”
“`
Once the installation is complete, you can check if Homebrew is installed correctly by typing the following command:
“`
brew doctor
“`
Step 2: Install OpenCV Python
Once Homebrew is installed, you can use it to install OpenCV Python. To do this, type the following command in the Terminal:
“`
brew install opencv
“`
This command will install the latest version of OpenCV Python. Once the installation is complete, you can check if OpenCV Python is installed correctly by typing the following command in the Terminal:
“`
opencv_version
“`
Step 3: Install Visual Studio Code
The next step is to install Visual Studio Code on your Mac. Visual Studio Code is a popular code editor that is used for writing and debugging code. To install Visual Studio Code, download the installation file from the official website and run the installer. Once the installation is complete, open Visual Studio Code and install the official OpenCV Python extension.
Step 4: Run OpenCV Python Code
Once the OpenCV Python extension is installed, you can now run OpenCV Python code in Visual Studio Code. To do this, create a new file and write your OpenCV Python code. Once your code is ready, click on the “Run” button to execute the code. You can also use the debugger to debug your OpenCV Python code.
Step 5: Test Your OpenCV Python Code
The last step is to test your OpenCV Python code. To do this, you can create a simple script that will use OpenCV Python to detect and display an image. Once the script is ready, run the script to check if the code is working correctly. If you need help debugging your OpenCV Python code, you can use the Visual Studio Code debugger to find and fix any errors.
Frequently Asked Questions
Here you can find the answers to some of the most common questions about how to install OpenCV Python in Visual Studio Code for Mac.
How do I install OpenCV Python in Visual Studio Code for Mac?
Installing OpenCV Python in Visual Studio Code for Mac is a straightforward process. First, you will need to download the OpenCV Python package from the official website. Once you have downloaded the package, you will need to open Visual Studio Code and install the Python extension. Once the Python extension is installed, you can open the OpenCV Python package and install the necessary libraries. After the libraries are installed, you can then open the OpenCV Python source code and start coding.
What are the requirements for installing OpenCV Python in Visual Studio Code for Mac?
The requirements for installing OpenCV Python in Visual Studio Code for Mac are relatively minimal. You will need to have a Mac that runs macOS 10.13 or later, and you will need to have the Python extension installed. You will also need to have the appropriate libraries installed to be able to open the OpenCV Python source code. Additionally, you will need to have the appropriate version of Visual Studio Code installed.
What libraries do I need to install for OpenCV Python in Visual Studio Code for Mac?
In order to use OpenCV Python in Visual Studio Code for Mac, you will need to install the appropriate libraries. These libraries include NumPy, SciPy, Matplotlib, Pillow, Scikit-learn, and OpenCV. All of these libraries can be easily installed using the Python package manager, pip.
Can I use OpenCV Python in Visual Studio Code for Mac without installing any libraries?
No, you cannot use OpenCV Python in Visual Studio Code for Mac without installing the necessary libraries. You will need to install the appropriate libraries in order to be able to open the OpenCV Python source code and start coding. Without the libraries, you will not be able to open the source code and therefore will not be able to use OpenCV Python in Visual Studio Code for Mac.
Is it possible to debug OpenCV Python in Visual Studio Code for Mac?
Yes, it is possible to debug OpenCV Python in Visual Studio Code for Mac. Once you have installed the appropriate libraries and opened the OpenCV Python source code, you can then set breakpoints in the code and debug the code in Visual Studio Code. This is a useful feature for debugging and troubleshooting any issues you may encounter while coding with OpenCV Python.
In conclusion, installing OpenCV Python in Visual Studio Code on Mac may seem like a daunting task, but with the right guidance and patience, it can be accomplished smoothly. By following the step-by-step instructions provided in this guide, you can successfully set up and configure OpenCV Python in Visual Studio Code on your Mac system, enabling you to develop and deploy advanced computer vision applications with ease.
As a professional writer, I understand the importance of staying up-to-date with the latest technologies and tools in the field of software development. Installing OpenCV Python in Visual Studio Code is just one of the many skills that can enhance your programming skills and enable you to create innovative solutions that can benefit society. So, don’t hesitate to explore new technologies and tools that can expand your knowledge and expertise, and help you achieve your career goals.